
How To Create an Online Course For Beginners (8-Step Guide)
Most people overcomplicate the process of creating their first online course, which is why they never actually launch.
They get stuck trying to perfect every detail, from the course outline to the learning management system, without ever putting their course content out into the world.
But I'm here to tell you it doesn't have to be that way ...
In this article, I’ll walk you through an 8-step process to create and launch your first training course—without the overwhelm, confusion, or tech headaches.
You’ll learn:
- How to pick the right course topic that aligns with market demand and attracts your target audience
- The best way to structure your course materials for maximum learning outcomes
- How to start selling your course—even before it’s fully built
- What tools and best practices will help you streamline the process
I’ve worked with countless course creators and coaches to help them build a successful online course business while working less than 20 hours a week.
This isn’t just theory—it’s the exact process I’ve used to launch my own digital products, build an engaged online community, and generate thousands in course sales.
If your goal is to turn your course into a passive income stream, I highly recommend checking out my free masterclass after reading this post.
It’ll walk you through a 3-part system to earn your first $2,000/month from online courses—without needing a massive email list, expensive marketing strategies, or complicated tech.
Let’s dive in and get your course launched the right way!
But before we get into creating your online course, I need to share the BIGGEST MISTAKE that most beginners make.
The Biggest Mistake New Course Creators Make
One of the biggest mistakes course creators make is thinking their online course needs to be a massive, all-in-one program from day one.
They spend months (or even years) building out an extensive course outline, adding tons of course content, perfecting their outline, and recording endless hours of video content.
Only to launch and realize that their target audience isn’t interested in what they created.
This is a massive waste of time, effort, and resources—and it’s one of the biggest pain points that keeps new course creators from ever launching a successful online course.
The Smarter Approach: Start with a Mini-Course
Instead of going all-in on a giant project, starting with a mini-course is a great way to validate your course idea, build confidence, and get real feedback from your first students—without the overwhelming commitment.
A mini-course allows you to:
- Test your course topic in the real world and see if there’s market demand
- Gain experience structuring course materials and improving learning outcomes
- Start making money faster while refining your marketing strategies
- Grow your email list and attract an audience of paying students
- Build an engaged online community of early adopters in facebook groups or membership platforms
By focusing on launching a mini-course, you’ll learn the essentials of online course creation without getting bogged down in complexity.
Plus, you’ll be able to create your sales page, test delivery methods, and gain valuable positive feedback before scaling up to a full-length training course.
When the time comes to build a more comprehensive program, you’ll already have:
- A proven course topic
- An engaged audience
- A validated course structure
- Experience with marketing tools like email marketing, landing pages, and social media promotion
Now that we’ve agreed that a mini course is the best way to start, let’s dive into step one of building your successful online course…
Step 1: Choose a Very Specific Topic
When brainstorming your first-time course topic, it’s crucial to be specific, not overly broad.
A common mistake course creators make is trying to teach too much in one training course, which overwhelms both them and their students.
For example, instead of creating a successful online course on "How to Play Guitar," narrow it down to a more focused course idea like:
- "Finger Picking 101: Master the Basics of Acoustic Guitar"
- "Music Theory 101: Understanding Chords & Scales for Beginners"
These focused digital products make it easier to attract the right people and give them a clear, helpful learning experience with real results.
And I didn't just make those examples up.
Those are real courses from Lauren Bateman, a course creator who teaches beginners how to play guitar, has generated over $2 million selling online courses.
She built her digital empire focusing on highly specific course topics rather than general ones.
Here are some ideas for your product ...
- How to Speak on Camera with Confidence: Perfect for coaches, content creators, or business owners looking to improve their video content and personal branding.
- How to Write Emails That Sell (Even with a Small List): A step-by-step training course on crafting persuasive email marketing campaigns that drive sales.
- How to Start Watercolor Painting as an Absolute Beginner: A creative and engaging online learning experience designed for beginners who want to explore watercolor painting.
The more specific your
Once you’ve chosen your
Step 2: Create Your Promotional Materials
Before investing your time into course creation, it’s important to ensure your
The
A Waitlist Page is essentially a
On this page, we're just going to have an email sign up box - we're not selling anything just yet.
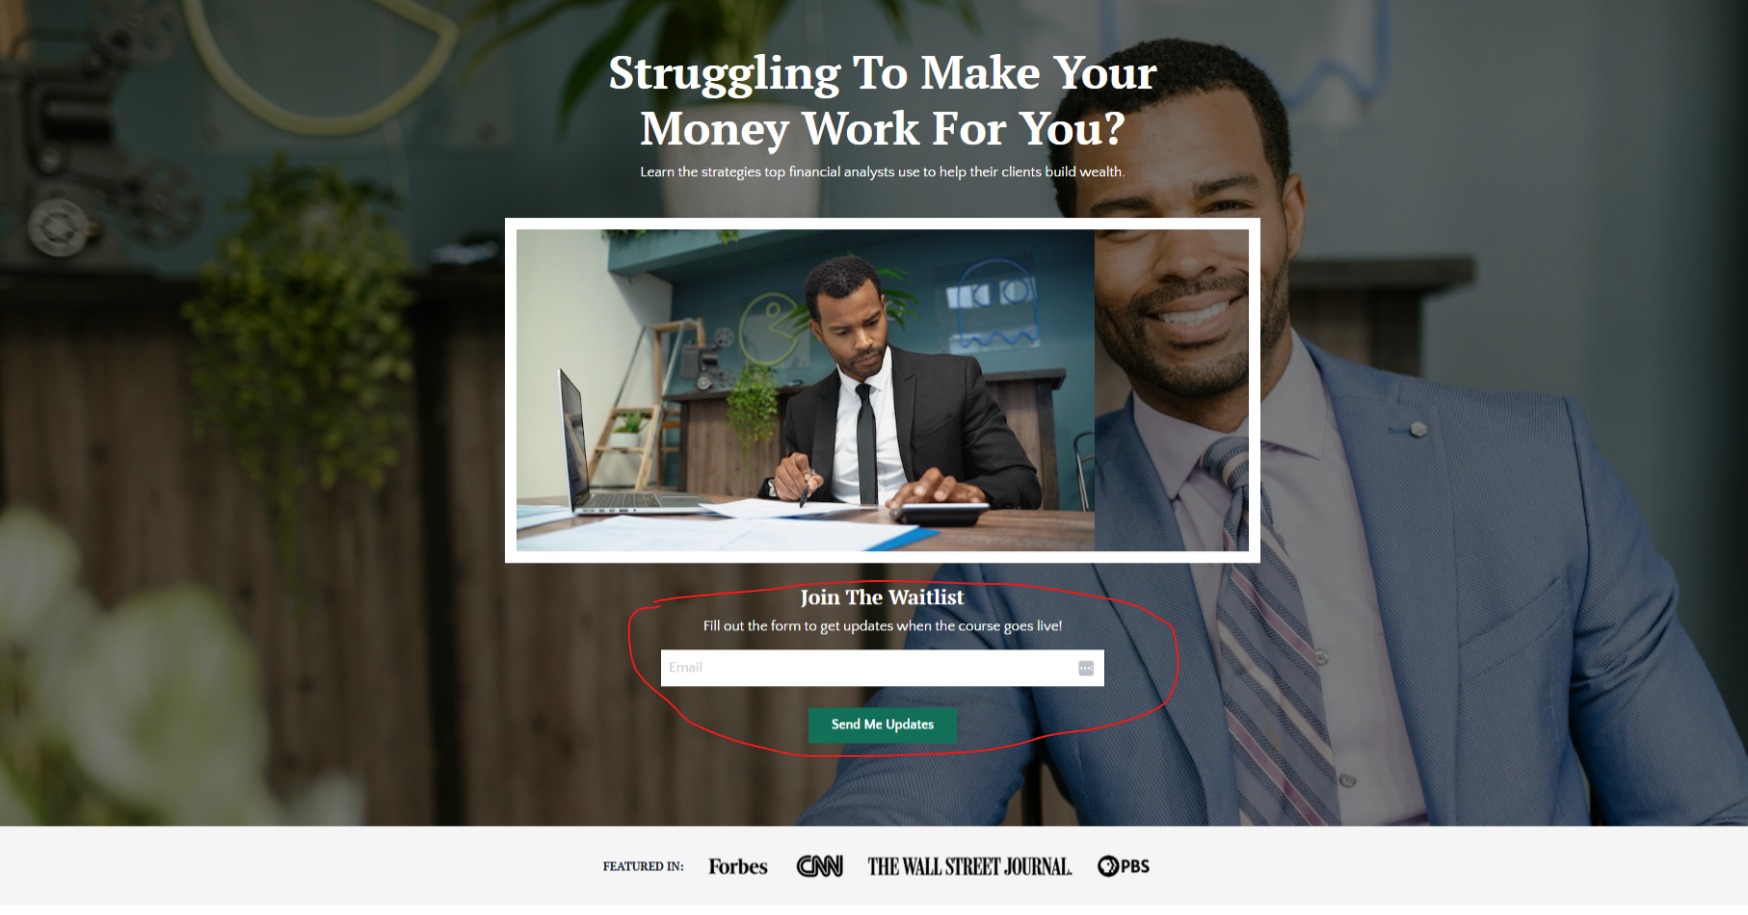
Instead of listing technical details or
For example:
❌ Less effective: “Includes 10
✅ More compelling: “Walk away with a simple money plan that puts you in control—so you can stop stressing about bills and start building real wealth.”
When your
How to Drive Traffic to Your Waitlist Page
Once your
1. Leverage Social Media
Share valuable content related to your
2. Engage in Online Communities
Join
3. Collaborate with Others
Team up with influencers, bloggers, or
4. Tap into Your Existing Network
Even if you don’t have a large following, your personal network is a
If you collect a few hundred emails on your
Step 3: Outline Your Course Content
Once you’ve validated your
Your goal here is to break down your
Keep Your Course Outline Simple and Focused
A common mistake
Remember, your students don’t need more content—they need clear and actionable steps that lead to results.
To make sure your course is digestible and easy to follow, map out each lesson with:
- A main concept (what the student needs to learn)
- Supporting examples or case studies
- Any
course materials , resources, or exercises that reinforce learning - A quick action step to help students implement what they’ve learned
This
Example Course Outline
Let’s say your
A structured
Lesson 1: The Psychology of Persuasive Emails
- Understanding why people buy from emails
- The role of storytelling in
email marketing - How to identify your audience’s
pain points andspecific needs
Lesson 2: The 3-Email Framework for Selling Without Feeling Salesy
- Breaking down a proven
email marketing formula - How to transition from value to selling naturally
- Writing with clarity and confidence to build trust
Lesson 3: Subject Lines & Hooks That Get Opens and Clicks
- The
best way to craft compelling subject lines - Using
ai tools to generate high-converting email hooks - How to avoid common mistakes that hurt open rates
Lesson 4: Writing Your First Sales Email (With a Simple Template)
- A
step-by-step guide to structuring your email - The
best platform to send your emails from - A
sneak peek at real-world examples of high-performing sales emails
Lesson 5: Automating Your Emails for Passive Sales
- Setting up an
email list and automated sequences - Choosing the
right online course platform for email delivery - How to turn your email sequence into a
passive income system
By following this
Now that your
Step 4: Create Your Course Content
Now that your
Each lesson should be structured in a way that delivers clear
Here’s a
1. Introduce the Key Learning Points
Start each lesson by outlining what students will learn and how it applies to their
For example, you could say:
"In this lesson, you’ll learn how to craft compelling subject lines that increase your email open rates. This will help you grab your audience’s attention right from the inbox and boost your
2. Explain Concepts Using Examples & Visuals
To create an engaging
If your course is
Using
3. Provide Supporting Resources
Include helpful
- Worksheets to help students apply what they’ve learned
- Templates for quick implementation
Audio files for learners who prefer to listen on-the-go viamobile devices Digital products like cheat sheets or guides to reinforce retention
4. Summarize and Provide Action Steps
At the end of each lesson, highlight the key takeaways and give students a simple action step to complete before moving forward. This ensures they apply what they’ve learned before jumping to the next concept.
5. Connect Lessons for a Seamless Flow
To maintain a logical learning sequence, always show how each lesson builds on the previous one. This keeps students engaged and prevents them from feeling lost.
Example:
"Now that you’ve mastered crafting effective subject lines, in the next lesson, we’ll dive into writing engaging email copy that keeps your readers hooked after they open your email."
By structuring your
Once you’ve completed all your lessons, you’re ready to move on to the
Step 5: Set Up Your Course Delivery Platform
You’re going to want to choose a platform to host and deliver your mini course. If you’re just getting started, choose something simple like Gumroad or Thinkific.
Don’t worry about making a huge amount of money right now. You’re just trying to get some traction. And if your mini course is successful, you can always move on to something more robust like my favorite platform, Kajabi.
Kajabi is an all-in-one platform that is well worth the extra bit of money you’ll invest in other tools.
Not only can you host your course there, you can also:
-
Build your website – Easily create a professional-looking website with customizable templates that suit your brand.
-
Set up
email marketing – Automate email sequences, send broadcast emails, and nurture your audience all from one place. -
Create landing pages – Build high-converting landing pages for lead magnets, sales pages, and opt-ins without needing a separate tool.
-
Offer memberships – Set up a membership site to deliver exclusive content to your subscribers or clients.
-
Sell products – Sell your courses,
digital products , and coaching packages using Kajabi's integrated checkout system. -
Track and analyze data – Get insights into sales, email campaigns, and user engagement to improve your marketing efforts.
-
Create quizzes and assessments – Engage students with interactive content to test their knowledge and boost their
learning experience .
Kajabi simplifies the process of creating, marketing, and selling your courses, allowing you to focus more on delivering value to your students.
If you use my link, you can get a free 30-day trial compared to the regular 14 trial Kajabi offers.
And on top of that, I’m giving you my Kajabi Kickstart course that will help you set your business up for success in that 30 days + a private 1-1 coaching session with me on Zoom.
Click here to grab your bonuses and start your 30-day free trial of Kajabi.
Now that you’ve built your course and chose a hosting platform, let’s talk about pricing.
Step 6: Pricing Your Mini-Course the Smart Way
Just because your
Many first-time
Start with an Accessible Price Point
At this stage, your primary focus isn’t maximizing revenue—it’s getting
A
This lower investment removes the risk for buyers and helps generate low-cost tripwire sales, encouraging students to actually complete the
Also, keeping your
Collect Testimonials to Build Trust
At the end of your
Use tools like Senja.io or Testimonial.to to automate the process and gather reviews you can display on your
Over time, these testimonials will boost your
Offer Private Coaching for Upsells
If you offer private coaching, your mini course can serve as a
Since buyers have already invested in your course, they’re more likely to consider higher-priced offers, such as a
A simple strategy is to include an offer for your coaching services at the end of your course, either through a call-to-action in your final
Now that you’ve set the right price and built a strategy to gather
Let’s dive into the
Step 7: Create a Sales Page and Refine Promotional Materials
Now that your mini course is ready, it’s time to convert your waitlist page into a high-converting
The
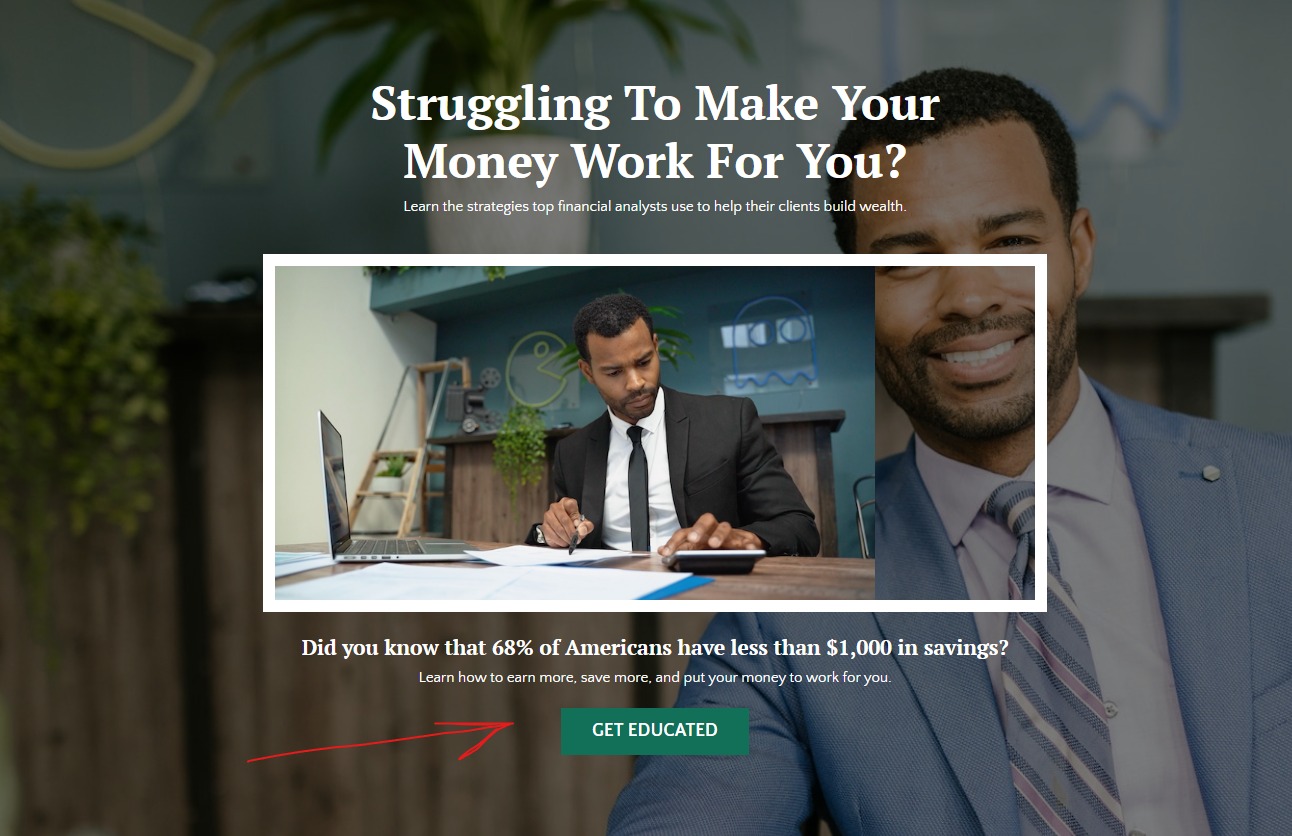
How to Optimize Your Sales Page for Conversions
Your
Make sure it’s designed with a
Here's an example of a good CTA:
"Ready to finally master the kitchen and cook meals that wow your family and friends? Click the button below to get instant access to Kitchen Confidence Kickstart and start creating delicious, foolproof dishes today!"
Where to Place Your CTA Buttons
To maximize conversions, include a CTA button in multiple sections of your
For button text, use action-driven, benefit-focused phrases like:
✅ "Start Cooking Like a Pro Now"
✅ "Enroll in Kitchen Confidence Kickstart Today"
✅ "Get Instant Access to Kitchen Confidence Kickstart"
Or it could just be as simple as "Enroll Now".
Additional Tips for a High-Converting Sales Page
- Use
video content or asneak peek of your course to showcase what’s inside. - Highlight
positive feedback or testimonials from early students. - Answer common
pain points with a detailed FAQ section. - Offer a
discounted price for a limited time to create urgency. - Include multiple
payment plans or afree trial option if applicable.
Once your
Step 8: Launch and Promote Your Mini-Course
To get the best results from your mini course, set a launch date and start promoting it to your
Use your
Create Urgency with a Special Launch Offer
A
This creates a sense of urgency and rewards early adopters for taking action.
Close the Cart for a Limited-Time Launch
Instead of keeping your
This does two things:
- It gives your students time to go through the
course content , apply what they’ve learned, and engage in thelearning experience without distractions. - It allows you to collect
positive feedback , testimonials, andmarketing strategies that will improve future launches.
Once your first-time students have completed the mini course, use their feedback to enhance your
This approach helps you grow your
Now that your launch is complete, it’s time to plan your
Some Final Thoughts on Building a Successful Online Course
Creating and launching your first online course doesn’t have to be overwhelming.
By following this
✅ Choose a
✅ Structure your
✅ Create engaging
✅ Set a strategic price point and build a compelling
✅ Leverage simple
✅ Gather
Launching a
Start small with a mini course, build momentum, and improve as you go.
The more you put yourself out there, the more confident you’ll become as a course creator—and the easier it will be to grow your
Don’t let perfectionism hold you back. Whether you’re working on your
If you’re ready to turn your
Your audience is waiting to learn from you—so take the leap and launch your
FREE TRAINING: Earn Your First $2,000/mo. With Digital Products
Discover the best products to build and how to sell them 24/7 without a big following, expensive ads, or complicated tech.
Earn Your First $2,000/mo. With Digital Products
❌ Massive Following
❌ Expensive Advertising
❌ Complicated Tech
